Monday, October 22, 2012

Drawloom Weavings at VavStuga

This post is of photos of drawloom or double harness weavings, all but two taken during the Sept. 17-21, 2012 Drawloom Basics class I attended at VavStuga.  These photos are posted here with the knowledge and permission of VavStuga, and my thanks to them for sharing these and so many more examples with their students, and allowing me to share a few of them here.


Opphamta weaving.


Shaft draw weaving.


Shaft draw blanket.


Shaft draw blanket.


Single unit weaving.


Smalandsvav coverlet with sheepskin backing, woven by Becky Ashenden.


Becky's coverlet, larger view (photo taken Nov. 2011).

Smalandsvav coverlet, by Susan Z. Conover, quilted, with handwoven band trim.


Susan's coverlet, prior to finishing, with reverse side shown on the right.  (Photo taken Nov. 2011)


Smalandsvav coverlet by VavStuga apprentice Terry Slagel, Sept. 2012.


Smalandsvav weaving.

Smalandsvav weaving.

Smalandsvav weaving.


Smalandsvav weaving.

We were shown so many other examples of double harness weavings, and I wish I had photos of all of them.  (Any errors in identifying the types of weaving shown here are mine.)  So, now it's time to learn more and begin weaving my own.

Sunday, October 14, 2012

Drawloom Basics Class, Part 3 of 3 ~ Samples

The photos and basic information are shown in the order they were woven, and unless otherwise indicated, the side you are viewing is the side that was up as woven.

Opphamta.

Opphamta weave has a plain weave ground, with pattern floats.  You work from a chart, your own design or one you found (be careful of copyright).  This sample has a warp of 16/2 cotton bleached (plain weave), and 16/2 linen for pattern.  Warp is 14 ends/cm., and 14 picks/cm.


"Double Dragons."

The "Double Dragons" were woven on an Oxaback single unit drawloom with the charted design saved in pattern lashes.  This piece is 5 shaft satin.  The warp is 28/2 line linen, half-bleached, and the weft is 12/2 line linen, natural.  Warp is 16 ends/cm, and 16 picks/cm.


Smalandsvav sample.

Smalandsvav is a double harness weave, and can be set up on a standard loom.  This particular loom had a small extension for the warp beam to improve the shed.  The warp is 16/2 cotton, 12 ends/cm, and has 16/2 cotton (single) for the plain weave, and 16/2 cotton (doubled, a shuttle with two bobbins), 12 picks/cm.


"Cattails" woven on shaft draw.

The "Cattails" were woven on an Ideal loom with Myrehed shaft draw system.  This photo only shows a portion of the piece but I wanted to include a bit of the border.  The weave structure is 8 shaft satin.  Warp is 8/2 cotton, 14 ends/cm, and weft is 16/2 linen, 14 picks/cm.


Charted design (underside when on loom).

For this piece, I had chosen a charted design that would not be too difficult to weave given the time allowed, and I added a simple border.  It was woven using a Myrehed single unit attachment on, I believe, an Anderson floor loom with long extension.  The warp is 22/2 cottolin, doubled (black), 20 ends/cm, and 16/2 linen (I chose bright red), 10 picks/cm.


This photo shows a bit of the border (underside when on loom).

This side was up as I was weaving.

When weaving, or researching a weave, I like to keep notes on warp and wefts used, sizes, fibers, sett, and so on, to help in future weaving projects.

The samples have not yet been hemmed or washed, so you do see a few wrinkles from being folded when shipped.  How I wish I had a cold mangle for pressing pieces as the iron does not seem to get the wrinkles out.  Even when I think they are, a photo shows they are not! 

The next post, coming mid-week, is of drawloom pieces woven as examples for students, and pieces hung for display.  I was particularly taken with the Smalandsvav and Opphamta pieces.

Friday, October 12, 2012

Drawloom Basics Class, Part 2 of 3


Smalandsvav sample.

My next weaving experience that week was Smalandsvav.  We had gone over basic design possibilities, and with that sheet in hand, and a bobbin with two shuttles, I decided to weave two colors at once.  It must come from my using three colors when cranking socks? 


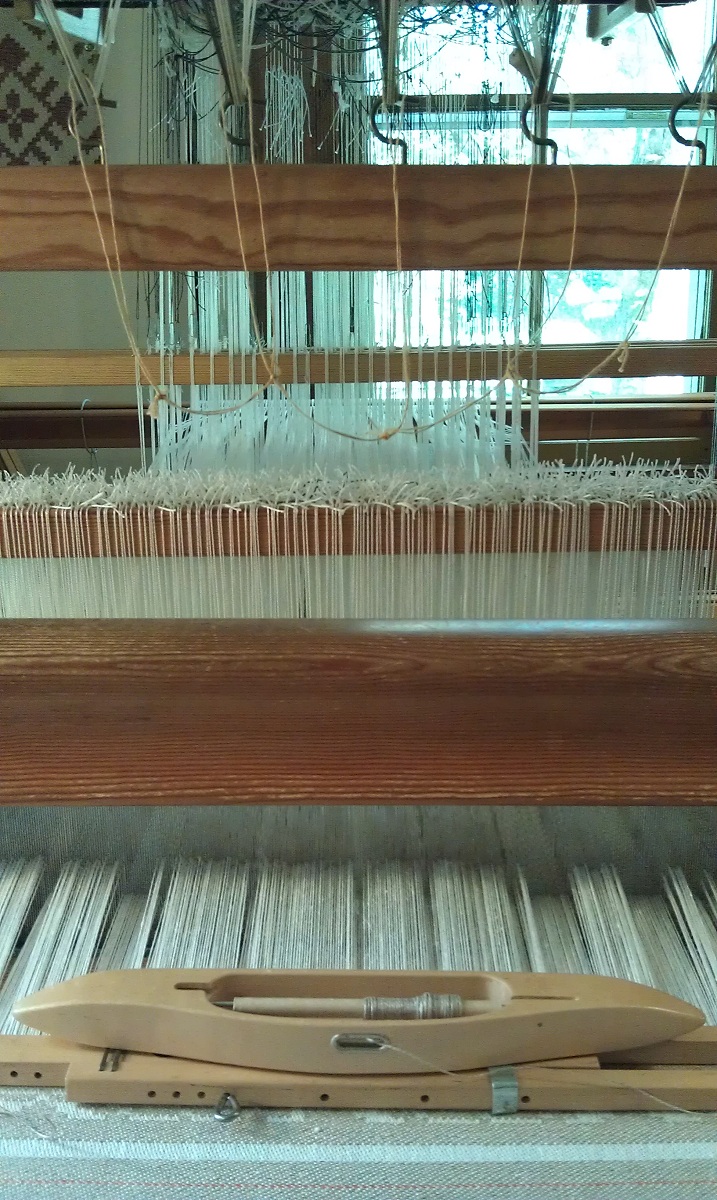
Smalandsvav is a double harness weave.

Smalandsvav is not woven on a drawloom but is a double harness weave, requiring two sets of shafts.  The above photo was taken to help me with setting up a loom at home when I weave this at home.


Small extension added to the loom.

Smalandsvav was set up on an Glimakra Ideal loom with a short extension added to help with achieving the shed.  A double-bobbin shuttle was used.


Cattail design being woven on a shaft draw system.


For weaving on the shaft draw system, also set up on a Glimakra Ideal, I chose a design of cattails.  What I did not realize (and still need to understand) was there was an "x shaft" in the design.  Though I worked from the center of the design when pulling the cords, you can see there are "double" cattails in the photo above that should be single.  I need to get "Damask and Opphamta" out to read and understand what was going on here.


Loom with shaft draw system.

Shaft draw systems are for weaving designs that repeat across the width of the fabric.  (The opphamta attachment also produces designs that repeat.)


A better view of the weaving, nearly completed.

My last weaving was on a loom with the Myrehed single unit draw.  With that setup, you can do freeform designs, though the design I had chosen (the first day of class) was a balanced design, with border I added. 


Drawcords are in front of weaver instead of overhead.

This loom had the newer Myrehed single unit attachment with drawcords coming down in front of the weaver, instead of the older style single unit drawloom with drawcord warp overhead (as in the single unit with lashes in the previous post).


The charts/designs used at the looms were kept on a magnetic board that sat on the bench next to you.  Pull the cords according to the chart, weave the required rows (depending on structure), release the cords, pull the new cords, weave,.... until design is completed.


A better view of the weaving in progress.

The warp was black, and I chose a bright red weft.  The only issue I had was getting used to focusing my bifocals on the cords so as not to have errors in the weaving.  I did end up with one error, but there was not enough time to cut it out and re-weave.  At home, I would never have left it in no matter how far back I had to go.  However, it was the last afternoon and I decided having a finished design was more important at that point.


Looking at the shaft draw piece.

Class Photo from Drawloom Basics, Sept. 17-21, 2012.

Part 3 will have photos of my samples (off-loom), and brief information on fibers used, sett, and so on.

Next will be one or two posts with photos of woven samples we viewed during the week as well as woven pieces on display.

Following those will be a post on the Helena Hernmarck tapestry exhibit "In Our Nature," at the American Swedish Institute in Minneapolis, along with a few pics from Swedish handknits and Swedish lace exhibits that were on at the same time.

Drawloom Basics Class , Part 1 of 3

Bridge of Flowers, Shelburne Falls, MA.

I returned to Shelburne Falls, MA to take another weaving class at VavStuga, this time "Drawloom Basics," Sept. 17-21, 2012. Arriving early afternoon, first I checked out the Bridge of Flowers.


Bridge of Flowers, in bloom!

I had been here last November, and most of the flowers were no long in bloom. This time, the bridge was a riot of color, something you need to see!

VavStuga, Shelburne Falls, MA (photo from Nov. 2011).

I travelled back to VavStuga to take their Drawloom Basics class, September 17-21, 2012.  Though we would be weaving off-site, most students stayed and had meals here (see three posts from January 2011 for photos from VavStuga Basics class, including the wonderful accommodations).


Susan Conover & Becky Ashenden at the start of a VavStuga lunch.

Breakfast, lunch, and dinner are available at VavStuga and are delicious!  Meals are served in the room at the back of the building with a wall of windows looking out onto the river and foothills.  At each meal, the table is set with different handwoven runners, placemats, and napkins, making each meal even more special.  Conversation and laughter accompany each meal with Becky, Susan, and the apprentice.

Accommodations at VavStuga are very confortable.  Each room has handwoven curtains, rugs, blankets, coverlets, and table covers, that make you want to go home and do the same!

During Drawloom Basics, we would have the opportunity to weave on  several different types of drawloom setups including opphamta, single unit with lashes, Smalandsvav, shaft draw, and single unit (Myrehed).


The VavStuga Drawloom Annex (as I call it).

The drawlooms had previously been set up when needed at VavStuga, but late last year the drawlooms had been moved to a farmhouse (above) about five minutes away, belonging to Becky's father.  The looms fill several rooms on the first and second floors in the right side of the farmhouse.  


You can clearly see I am enjoying the week!

One room has two long tables and chairs, used for lecture, drafting, viewing many, many samples, and where we worked on designing. 


Weekly Schedule.

Copy of schedule.

Becky had prepared a weekly schedule showing what loom each of us would be working on each day, and for how long.  A daily schedule was also available.  Some projects were allowed 7.5 hours, others were 3.5 hours.  Days were broken up with lecture, explanation of looms and how they work, drafting, and designing.  It was always a treat to be shown many examples of the different types of weaving done on the various drawloom setups.  Photos of those as well as older pieces on display in the rooms were will be in the third post.

The first day began with designing.  We could design our own or use a design from any of the many books/charted designs available.  I chose a design from a book, and that evening added a border.  This design turned out to be the last project I did, on Friday of that week, woven on the drawloom with a Myrehed single unit setup.  Photos will be in the next post.  More designing went on during the week as well as drafting.


Loom with "opphamta attachment."

On Day 2, I started weaving Opphamta, on a loom with a 20 shaft attachment (not all 20 were not tied up and being used).  This was a 3.5 hour project.  I didn't have much time and may have made an error on my charted design, but this is what I came up with.  Opphamta has a ground of plain weave, and the design of floats.


My weaving, in progress.

My weaving after having rolled under the warp as another student was weaving.

Single Unit Draw with Lashes.


My next weaving session was on an Oxaback single unit drawloom with the design we would all weave saved in lashes.  This was a BIG loom, heavy, beautiful,... and I found it physically a bit more challenging to weave on simply because I am 5'4", shorter arms and legs, and as I say, this was a big loom.  I tried weaving standing up, but that didn't work.  Sitting on the bench, I couldn't move the lashes far enough to the back and ended up using the cloth protector piece to push them to the back of the loom.  Where there is a will, there is a way!


Here you see the lashes hanging down and the cords pulled for a particular line on the chart. 

My view while weaving.

Completed "double-dragon" weavings.

On this loom, because the design was saved in lashes, we all wove the same double-dragon design, linen warp and weft, and name tags on each so we would have our own to take home.

Tomorrow, I'll photograph my weavings, meanwhile, I'll get to work on the photos for Drawloom Basics Class, Part 2.